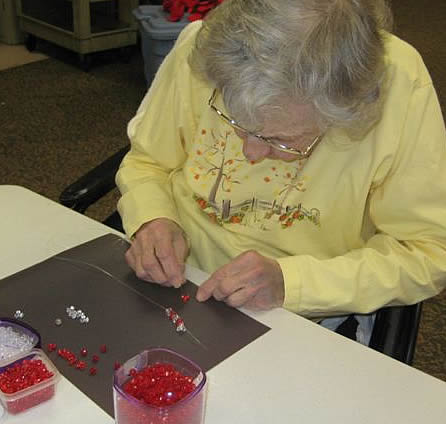
 About Crafts and Therapy About Crafts and Therapy
Craft therapy is healing and inbvigorites the mind as well as the body. Robert Reiner, PhD, a New York University psychologist, says that crafts reduce stress. "The act of performing a craft is incompatible with worry, anger, obsession, and anxiety. They're stress busters in the same way that meditation. deep breathing, visual imagery, and watching fish are."
So whether the need to craft is because of an illness
or accident, crafting not only exercises physical skills but also reduces stress
and enhances well being and self esteem. It provides a sense of accomplishment
and pride that triggers positive feelings and promotes a can-do attitude toward
other situations. And that is a real benefit of crafts; feeling purposeful in
life.
Check these adapted scissors out!
Loop Scissors

As an Amazon Associate I earn from qualifying purchases
|
Benefits of Therapeutic
Crafts
In addition to a fun and creative leisure experience, there are many therapeutic benefits of crafts such as:
- Increased cognitive functioning
- Increased self expression and decision
making skills
- Increased or maintenance of fine motor
skills
- Improved ADL skills
- Enhanced hand-eye coordination
- Increased self esteem and emotional
well-being
- Increased opportunity for empowerment and
self expression
- Increased socialization
Craft Project Ideas
There are many projects that can be made with materials that you probably have on site or in your home. Here are a few projects for inspiration.
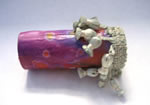 Napkin Rings Napkin Rings
Unsure how I first thought of this one, but I have
everyone giggling when they realize the “green” source of my idea
Materials
- Empty toilet paper roll(s)
- Attractive paper or lightweight fabric for decoupage
(I use the attractive cotton fabric sold to quilters in fat quarters)
- Modge Podge glue
- Scissors
- Optional: trimming or fancy yarn
Process
Measure the paper/fabric piece by wrapping it around
the paper roll so it can be cut where the material will slightly overlap. Take
this cut piece and now measure it for length, leaving about ½ in excess at each
end so the material can be tucked in the tube. You now have a piece that should
fit your toilet paper roll.
Spread the glue over the roll and place your material
over it. Make sure to give special attention to the joining of the fabric over
the roll and bend the edges over both ends of the roll and secure with glue. Now
slather the glue over the material to secure it in place. Let it dry and the
glue will be transparent.
I recommend an Acrylic fixative type of spray to give
the napkin ring a finishing touch and a more durable surface.
Optional - Once it is dry, measure
your trim around the paper roll and cut. Glue the trim in place.
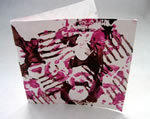 Printmaking Printmaking
There are many ways to make prints from the basic to
the complex. The following project is adapted from one that I did with my
children and is suitable for both children and adults.
 Materials Materials
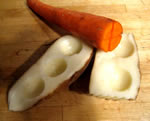
- Potatoes (larger baking type) and thick carrots (if you want to use only one vegetable, use the potato)
- Knife Acrylic or poster paint
- Dish/tray for paint(s)
- Paper
Process
The good news is that you do not have to scrape the vegetables clean! The vegetables are used for a shape silhouette. Cut the potato in half; it can be cut lengthwise if you plan to use a larger surface to create a design or in half horizontally if you need a bigger grip to hold the potato during the printing process. Cut the end off the heaviest part of the carrot.
Optional - You can use a melon scooper or other kitchen tool to carve out a pattern in the potato.
Place your paint in a dish or tray. You can use a different color for each surface. So if you have one potato and one carrot, you have 3 surfaces and the opportunity to work with 3 different colors. Dip the exposed surface of the vegetable in the paint and scrape off the excess against the edge of the tray. Press firmly down on paper and lift off. Repeat this with different colors/surfaces until you have the desired design.
Paper
You can choose to make designs on pre-cut cards or on a large piece of oaktag paper which can be cut up into smaller units for cards. The latter is fun and quick and sometimes makes more interesting cards!
 Off the Loom Weaving Off the Loom Weaving
Understanding how to weave and setting up a loom can be daunting for some people. However most understand the premise of weaving as “over one and under one” repeated across the fabric. This can be done without buying a loom or special tool, you just need 2 hard back chairs where you can tie the yarn through and around the bar across the back.
Materials
- 2 hard back chairs that have an opening on the back. Ladder type chairs or spindle chairs work well for this project.
- 2 balls of yarn which are visibly different from each other (esp. a ribbon and a novelty) and have over 100 yds per ball
- Tape measure
- Scissors
Cut 12 pieces of each yarn in lengths of 80 inches. Tie one end from ball “A” to one end of ball “B”. Repeat this so you have 12 pieces of yarn and each piece has both yarns attached.
Take one of the double yarn pieces and thread it through the back of a chair, letting it hang down. Continue with the rest of the yarn ends threading them equally across the back.
Take your other chair and with the back facing the back of the other chair, tie each yarn around the open back of the second chair to create a loop; there will be 12 loops in all. Be careful to maintain the same yarn on top.
When it is all threaded and tied, move the 2 chairs apart to create tension. This will be your “warp”. Use the remaining yarn as your filler or “weft”.
The weaving process
Thinking of Color “A” as ribbon and the novelty yarn as Color “B”, as you weave, you will be alternating placing your yarn under Color A and then the next row placing your yarn under Color “B”. It is important to place the yarn over and then under consecutive warp yarns. If you make a mistake, it will be easy to see and fix before you complete your next row. However, if you make a mistake and do not see it until far into the project, do not worry. The contrast of these 2 yarns is usually very forgiving to the eye and will be hard to see the error.
Weaving with yarn on shuttles
Yarn shuttles are optional and are simply a flat holder for the yarn to be wrapped around. Before you weave across each row, unwind enough yarn off the shuttle to be woven across the warp. You can weave with only the novelty yarn or make stripes by alternating with the ribbon yarn. Although the ribbon yarn occupies more weaving space because it is a flat yarn, you will probably have fewer yards of the ribbon yarn available after setting up your warp.
Beginning the project
Starting about 8 inches away from the chair knot, take your yarn and go under all the Color “A” yarn (eg. ribbon). Let the first end of this weft yarn hang a few inches over the warp as we will take care of it later.
For the next row, you will alternate now by weaving under all the Color “B” (eg. novelty) yarns. This row requires your careful watch. You gently lift the B warp yarns up as you place yarn under them. It is important to pick up each “B” yarn consecutively as you gently push down. Repeat this “over and under” weaving process and keep your weaving fairly loose across the warp. Gently let your weft yarn slide next to the previous weft yarn but do not push hard against the previous row. Also keep it somewhat loose at the edges so it does not curl.
Finishing
When you have finished weaving, you are ready to take your beautiful new scarf off the chair backs. One at a time, untie the bow and make a gentle knot against the fabric with the 2 ends but do not push it too tight against the woven area. This will keep it from unraveling. Continue across the chair back opening, one loop at a time- until all the yarn ties are knotted. Then repeat this at the other chair.
Lay the scarf on a flat surface and cut the ends (which are fringe) to make them even on each side. You will have some “tails” of yarn from starting and ending the filling process and with your fingers, simply weave them gently in place in the scarf fabric.
TIPS
Remember that in weaving, the yarn color that you go over in one row is the same color that you go underneath in the next row.
Try to be loose and consistent in your weaving. If you pull too tight around the edges, the width of the scarf will shrink. Also, do not “pack” in the yarn filling (weft), you may run out of yarn and your scarf may be too bulky. Let the weft set gently against the preceding row.
There is no right or wrong way to use color as your weft. You may choose to alternate colors or to use one yarn as a weft for half the scarf and one color for the other half of the scarf. Changing colors in your weft produces stripes.
If you alternate colors for each row of weft, make sure that at the end of each row, the previous yarn lies next to the last warp yarn so that it is held in place on the next row as you weave.
Judith Zausner is the owner of Caring Crafts Inc., an online source that provides simple, yet elegant craft kits. For more information, contact Judith at judith@caringcrafts.com or visit
www.caringcrafts.com

|